Welcome travelers!
Natural Born Vagabond™ is a bilingual (English and Polish) site devoted to travel photography and journalism. Here you can find images and articles from our remote travels. The ambition of the creators is to share the best stories with those who crave wilderness and adventure. If you would like to share your opinions or travel stories please contact us via e-mail.
Featured

Natural Born Vagabond™
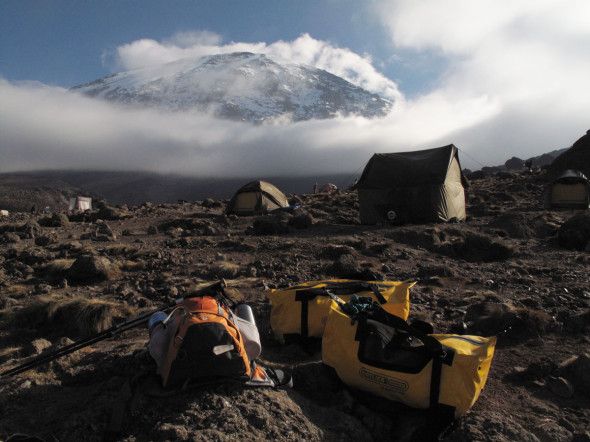
How to prepare for the Kilimanjaro trek?
For experienced mountaineers, there is no need to remind how important it is to team up with the right partner(s) for the expedition. A word of advice for those less exposed to mountaineering culture: Choose your team right! It will be that much easier if the group is serious and prepared to do the work that is required to reach the summit. The ability to be able to rely on each other’s sense of humour will be essential in keeping spirits high when tiredness sets in the body and mind. Long days without the comforts of modern amenities may wear some people more than others. (For example, there are no showers or proper toilets on the trek — so make sure you pack plenty of wet wipes!) Make sure you know what you are getting yourself into and prepare. The more you know about your comrades, guides, the chosen route and the necessary equipment, the better will be your experience.
The trek is not cheap and most people are not likely to get a second chance at it, so it is imperative to make the most of the experience. To really enjoy the climb to its fullest its best to get in shape before the trip. If the gym is not your thing, good alternatives are bicycling and running; but nothing conditions and prepares the body better than hiking (high altitude, if possible) with a backpack. You may also consider breaking the 4,000 m barrier in advance to check how your body reacts to high altitude.
Also, for the lonely mountain goats hoping for a solitary experience — Kilimanjaro is a very social experience: You will be sharing the road with many other trekkers and porters. Depending on the season and route you take there may be many people on the way up (and down).
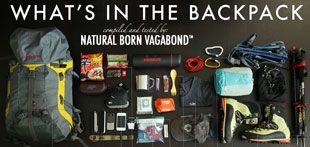
Kilimanjaro packing list: What to take?
No specialised equipment is necessary! For most of the time, hiking the slopes of this volcano mountain (the world’s second tallest volcano mountain) is no different than a regular rocky mountain trek. However, it can get muddy during the wet season and very dusty during dry season. For most of the people, the biggest challenge may be the night of the final ascent (starting at 4,600 m and reaching 5,895 m in ~6 hours). If you put some thought into it (i.e. ensure that you have proper gear and stay hydrated and of good spirit), it is possible to mitigate many of the discomforts on the way up and have a safe journey down. We also suggest that you check the itemised packing list suitable for most backpacking trips.
Essentials:
– Comfortable and light day-pack for day treks: Since porters are taking your luggage in the morning, you will have to carry basic daily essentials (e.g. water, snacks, camera, rain gear, wet wipes, etc.) with you in a small back pack.
– 2 pairs of hiking pants: You can take as many as you want, but 2 pairs of breathable, windproof and waterproof hiking pants are a minimum.
– 2 pairs of gloves: Thin gloves for every day use, plus a warm extra pair for the night of the final ascent.
– Warm socks: Best are merino wool socks — they will keep your feet warm, dry, and odour-free during long days and cooler nights.
– Hat: Something that preferably covers the ears and face from the sun and/or rain.
– Fleece or sweat pants: You will want to unwind in a pair of comfortable pants at the campsite, but make sure they are appropriate for the cool/cold mountain nights.
– Long underwear: Preferably made of merino wool — it breathes well, will keep you warm at night and prevents unpleasant odour. Nevertheless, after the 3rd day of the trek you will stop noticing who stinks worst — you or your tent buddy.
– Comfortable sturdy hiking boots: These are a must and it is best if they have thick soles. Make sure that they are appropriate for trekking in volcanic rock areas and even sometimes in mud and dirt. Thick Vibram soles will protect your feet. Make sure your boots fit you well before the trip; i.e. do not bring a fresh new pair for the hike — it is imperative to break them in before the actual journey. For superior comfort your boots should be a little above the ankle and water resistant.
– CamelBak 3-litre water reservoir. There are couple reasons to use the CamelBak system and not a regular water bottle on the long treks: (1) It keeps your hands free whenever you need, and (2) it helps you stay hydrated at all times (the burden of needing to take out a water bottle from your day-pack will indeed reduce the amount of water consumed).
– Wet wipes: Preferably 2 large packs (for “showering”), plus individually packed single wipes that you can keep on your person at all times. (You will be provided with water for washing up at your campsite, but it is in limited quantity and often very cumbersome as it is provided in a small bucket.) Wet wipes will help you keep your hygiene.
– Toilet paper: The toilets — they are really squat holes — on the path are, to say the least, not pleasant. And you will not find toilet paper or any other creature comforts in these outhouses. So bring plenty of toilet paper with you. And given the appalling state of most of the toilets (and their scarcity), you may even find yourself in situations where you will have to do your business in the “bushes” or any place with some sort of privacy.
– Sun screen cream: Winter sunscreen is the best (preferably above 30+), it will also protect you from the wind and dryness.
– Glacier sunglasses: The Sun at high altitude is particularly strong, so glacier sunglasses (as opposed to normal sunglasses) are preferred since they have high UV filters and also provide lateral protection for the eyes.
– Chocolate bars: Take plenty of your favourite brands (in snack-size portions)! Nothing cheers you up after a monotonous meal like a tasty chocolate! But beyond an excuse to indulge in sweets, chocolates are a great source of energy for treks and on the journey your body will definitely be in need of a boost on more than one occasion.
– Warm sleeping bag: Heed these words: The cosier the sleeping bag, the better for you! Do not skimp on this item. You will feel the difference in a quality of your rest. And how well you hike in the day is a direct function of how well rested your body is during the night.
– Comfortable sleeping mat: See above. Get yourself a good thermo mat; the thicker, the better.
– Handy Camera: There wont be much time to search for your camera in your backpack each time you want to take a photo. Moreover, your hands will likely be busy clutching onto hiking poles. So not to miss capturing the amazing vistas and scenery with your camera it is best to have it handy. Either have your camera on a strap or hang it on you for easy access.
– Gaiters: One of the worst feelings is walking in wet socks or with stones in your shoes. Well-fitted Gaiters will save you from suffering these pains.
– Hiking poles: Unless you are a mountain goat, your body, and especially your back and knees, are likely to get fatigued from the constant ascents and descents on rocky terrain. Hiking poles will ease some of the pressure from your back and knees. They are particularly useful going down and will help prevent you from falling. Likewise, rocky and slippery terrain can be a challenge at fast speeds — hiking poles will be a saviour in these situations.
– Headlamp + extra batteries: At night the only sources of light are the stars and the Moon. If it is a cloudy day or a new Moon you will be in total darkness once the sun sets. Headlamps are especially useful when trying to find your way to the loo (i.e. outhouse — plus you will not want to be in there in the dark!) if you need to relieve yourself in the middle of the night. It will also be especially useful on the final ascent since it will be during the night (midnight to 6 AM).
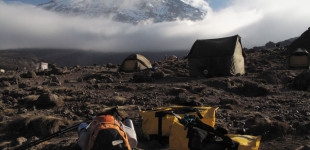
– Waterproof and durable Duffel bag: This will help the porters transport your stuff from campsite to campsite. The porters have an amazing talent in carrying everything on their head (and will whisk by you in their flip flops while balancing 15 kg of stuff on their head). Anyhow, be prepared to have the stuff you leave with porters for transport to be tossed on the ground and rocks. It is your responsibility to pack your luggage safely and within the weight limit (typically not exceeding 15 kg). Finally, do not attach anything on the outside of the Duffel bag — it may be lost or damaged otherwise (not to mention also making it more difficult for the porters to carry).
Essentials for the ascent to the summit:
– Energy snacks: We packed chocolate-covered dates and standard energy bars. Regardless of preferences, the key point is to have them easily accessible and in snack-size packs/portions.
– Down jacket: Depending on the season, a light jacket may suffice for most of the trek. However, for the final ascent — regardless of the time of year — a warm jacket (best if light) is necessary. The temperature at the peak will be in the range of -15 to -30 Celsius and winds can be strong, so be sure to bundle up, especially as the weather at the top is unpredictable.
– Thermos: On the last night, leave the CamelBak at base camp (4,600 m), as it may freeze on the ascent to the peak (5,895 m). Instead, a thermos with hot tea will be a better solution. However, do not count on many stops on the way up as your guide will not allow you to rest long (lest your body — in ache and pain and with little oxygen — shut itself down and not cooperate in reaching the summit).
– Warm windproof pants suitable for snowy conditions: It will get cold up there (even for those from Arctic/Nordic countries). On the high altitude (for many, the marker is at 5,000 m) your body will get extremely tired even if it was hitherto doing perfectly well. When you are close to the peak (Uhuru) and the sun has yet to rise, every second pacing towards the pinnacle will feel like an eternity in the Arctic. A warm bottom will also give you more vigour in taking photos when you reach Uhuru. On the descent you will warm up, but no need to worry as you will be able to shed them as you slowly go back to base camp. So keep in mind that will be able to lose your heavy pants as you layer on the night before.
Altitude sickness.
Everyone reacts differently to high altitude (and fitness is not a perfect or even a good predictor). Typically most people are affected at 4,000 m, but it can be higher or lower specific to each person. Be cautious of soft symptoms of altitude sickness as they may go unnoticed and thus may ultimately impede a successful ascent of Kilimanjaro. Be aware of your body’s reaction to the thin mountain air and check with your guide if you notice any of the below:
– Lack of appetite
– Headache
– Nausea and/or vomiting.
How to avoid altitude sickness? It is advised to get proper acclimatisation to the altitude, which is why it is advisable to opt for longer treks where possible. Most of all, do not forget that dehydration is dangerous in mountains! Drink lots of water (even if you do not feel like it) — 3 litres per day during the entire trip should help your body adjust better to the reduced pressure on higher elevations. A good gauge on your hydration level is to check the colour of your urine: If it is dark yellow it is a sign that you need to drink more. Read more about altitude sickness.
Descent.
Many people underestimate difficulties of the way down and forget that they need energy not only to climb up, but (and perhaps even more so) also to come down from the peak. We found our descent particularly tiring. Get yourself mentally ready to wade in knee-high loose volcanic gravel for much of the down journey. But if you made it this far, and are descending after having successfully reached the top, just think to yourself that the pain and the exhaustion will go away in a few hours (or days), but you will have this cherished memory for a lifetime!
Happy trekking!
Check also details of our expedition in August 2012: On the roof of Africa — Kilimanjaro trek
Our Art Shop:
Artykuły po polsku (PL)
Krótki przewodnik po Dubaju w języku polskim:
Dlaczego warto odwiedzić Koreę Południową:

Zwiedzanie Etiopii -- od czego zacząć:
Publications:
Check also:
 Good Reads:
 World of Postcards:
 Language schools reviews: